

How to Season a New Griddle for Commercial Kitchens
If you're wondering how to season a new griddle, the core idea is simple: you apply a thin layer of cooking oil and heat it until it bonds to the surface. This creates a natural, non-stick finish that will make or break your cooking experience. Honestly, it's the single most important thing you can do for your new equipment.
Why Seasoning Your Commercial Griddle Is Essential
Unboxing a brand-new commercial griddle is a great feeling. But right out of the box, that raw steel surface is vulnerable. Before you even think about throwing on a single burger or pancake, every professional griddle needs to be seasoned. This isn't just a friendly suggestion; it's a foundational step that will dictate how your griddle performs and how long it lasts.
Seasoning essentially transforms the porous, raw metal into a smooth, glass-like cooking surface. This happens through a chemical reaction called polymerization. When you heat oil to a high enough temperature, it breaks down and bonds directly with the steel, creating a hard, slick layer that's crucial for any high-volume kitchen.
The Science of a Perfect Cooking Surface
This isn't new-fangled tech; the tradition of seasoning cookware goes way back to the early days of cast iron in the 19th century. In a modern kitchen, the science is exactly the same. The sweet spot for this process is heating the griddle to somewhere between 375°F and 450°F for about an hour, which gives the oil enough time to properly polymerize. You can dive deeper into the technical side of the restaurant griddle market over at futuremarketinsights.com.
But this protective layer does a lot more than just keep food from sticking. A properly seasoned griddle brings some serious advantages to the line:
- Rust Prevention: The layer of polymerized oil acts as a barrier against moisture and air—the two main culprits behind rust on raw steel.
- Consistent Heat Distribution: A good seasoning helps spread heat more evenly across the flat-top. This gets rid of those pesky hot spots that can scorch one pancake while leaving another one pale.
- Enhanced Flavor Profile: Over time, that seasoned surface—what chefs call a "patina"—develops a unique character that adds a subtle, delicious flavor to everything you cook.
A well-seasoned griddle is the unsung hero of a busy kitchen line. It’s not just about non-stick performance; it's about reliability, consistency, and protecting a vital piece of equipment from the daily grind.
At the end of the day, understanding why you're seasoning your griddle is the first step to mastering the technique. Whether you're setting up a new diner or upgrading a restaurant kitchen, taking the time to explore different commercial griddles and their specific needs will pay off in the long run.
Choosing the Right Oil for a Perfect Griddle Surface
The secret to a fantastic griddle seasoning isn't complicated. It all boils down to one thing: your choice of oil. But this isn't about flavor—it's about pure science. You're looking for an oil that can handle the heat, polymerize correctly, and create that slick, non-stick surface that makes a commercial griddle a joy to cook on.
The most critical factor here is the oil's smoke point. That's the temperature where the oil stops just shimmering and starts to smoke, signaling it's breaking down. For a solid seasoning, you need an oil with a high smoke point, something that can comfortably handle the 400°F–450°F temperatures needed for polymerization.
If you pick an oil with a low smoke point, like butter or extra virgin olive oil, you’ll end up with a sticky, gummy disaster instead of a beautiful cooking surface.
Top Oils for Seasoning Commercial Griddles
So, which oils actually make the cut? Your best bet will always be high-heat, neutral-flavored oils. They're cost-effective for a busy kitchen and give you the same great results every time you re-season your griddle.
Here are a few of the go-to options:
- Canola Oil: You can find it anywhere, it's cheap, and its smoke point is around 400°F. A real workhorse.
- Grapeseed Oil: A favorite in many professional kitchens for a reason. It has a nice high smoke point of about 420°F.
- Flaxseed Oil: This is often called the "gold standard" for seasoning. Its high concentration of ALA fats creates an incredibly hard, durable finish. The downside? It's pricey.
To help you decide, here's a quick comparison of the most common choices.
Commercial Griddle Seasoning Oil Comparison
| Oil Type | Smoke Point (°F) | Pros | Cons |
|---|---|---|---|
| Canola Oil | 400 | Affordable, widely available, neutral flavor | Can sometimes leave a slightly sticky finish if not fully polymerized |
| Grapeseed Oil | 420 | High smoke point, clean flavor, lightweight | More expensive than canola or vegetable oil |
| Flaxseed Oil | 225 | Creates the hardest, most durable seasoning layer | Very low smoke point, expensive, can be prone to flaking if applied incorrectly |
| Vegetable Shortening | 360 | Inexpensive, creates a decent non-stick surface | Lower smoke point, contains trans fats |
| Avocado Oil | 520 | Extremely high smoke point, excellent for high-heat seasoning | The most expensive option by a significant margin |
Ultimately, picking the right oil is about balancing cost, availability, and performance.
The best oil for the job is one that polymerizes cleanly, forming a tough, resilient layer. Think of it as applying a protective coating to your equipment—you want the strongest material available.
For most commercial kitchens, especially those running a dependable electric griddle, canola or grapeseed oil hits the sweet spot. They offer the perfect blend of affordability and effectiveness to build that initial seasoning layer you'll rely on day in and day out.
The Commercial Griddle Seasoning Process
Alright, you've picked out the perfect oil. Now it's time to get your hands dirty and turn that slab of raw steel into a slick, non-stick workhorse. Think of this less as a strict recipe and more like getting a feel for what the griddle needs. It’s a bit of an art form, but one you’ll master quickly.
Getting Started: The Initial Clean-Up
That brand-new commercial griddle comes coated with a factory-grade protectant to keep it from rusting in transit. That stuff has to go. This is the one and only time you should ever let soap touch your griddle surface.
Give the entire flat-top a good scrub with warm, soapy water and a non-abrasive pad. Rinse it thoroughly with clean water, making sure there's absolutely no soap residue left. Then, grab a clean towel and dry it completely. Seriously, get every last drop—moisture is the number one enemy of a good seasoning.
Laying Down the First Coat of Oil
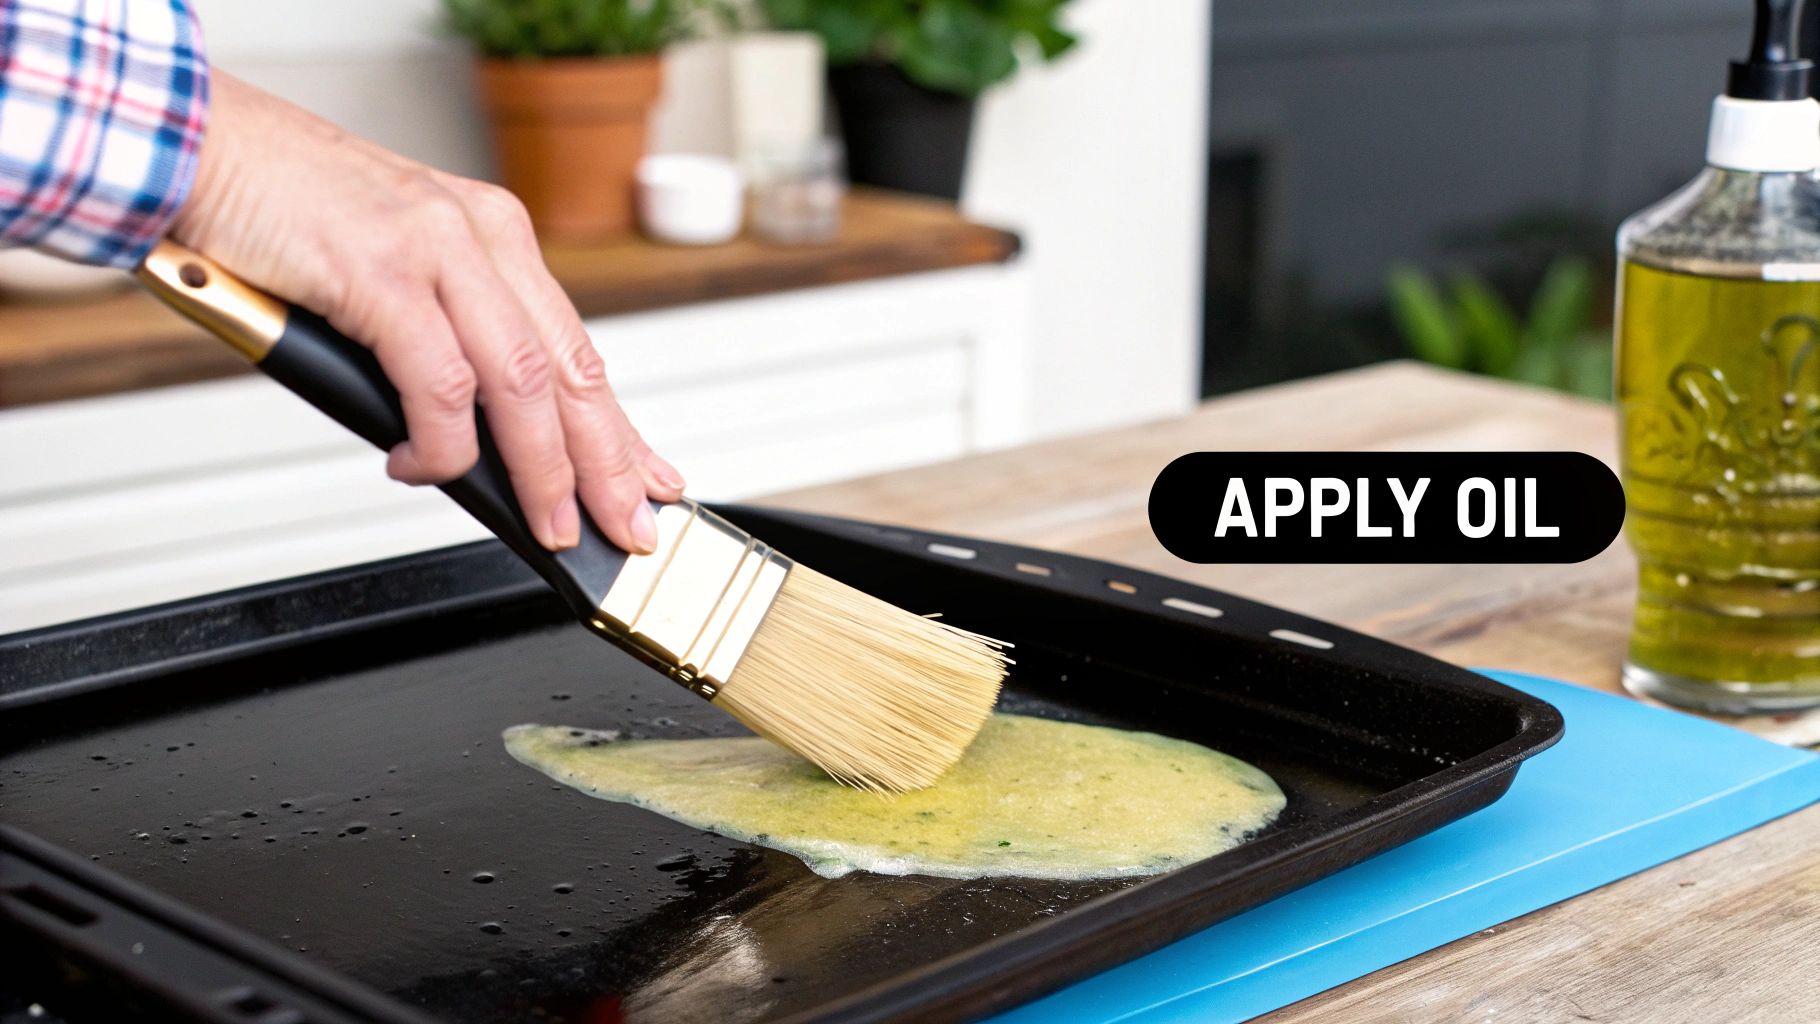
With a sparkling clean and bone-dry surface, it's time for the first layer of oil. The secret here is an ultra-thin, even coat. Less is definitely more.
Pour just a small amount of your chosen oil onto the griddle. Use a lint-free cloth or a wad of paper towels held by tongs to spread it over every inch of the surface. Don't forget the sides and corners.
You're aiming for a micro-thin layer, almost like you're polishing the metal. If you see any oil pooling or streaking, you’ve used way too much. This is the most common mistake people make, and it leads to a sticky, gummy mess that you’ll just have to strip off and start over.
Wipe off the excess until the griddle just has a faint sheen. It should look barely damp, not greasy. This minimalist approach is what creates that tough, durable finish.
Firing It Up: The Polymerization Cycle
Once you've applied that first whisper-thin layer of oil, you're ready to bring the heat. This is where the magic happens. The cycle of heating, smoking, and cooling is what molecularly bonds the oil to the metal, building your non-stick surface layer by layer.
This visual breaks down the basic temperature management for each round of seasoning.
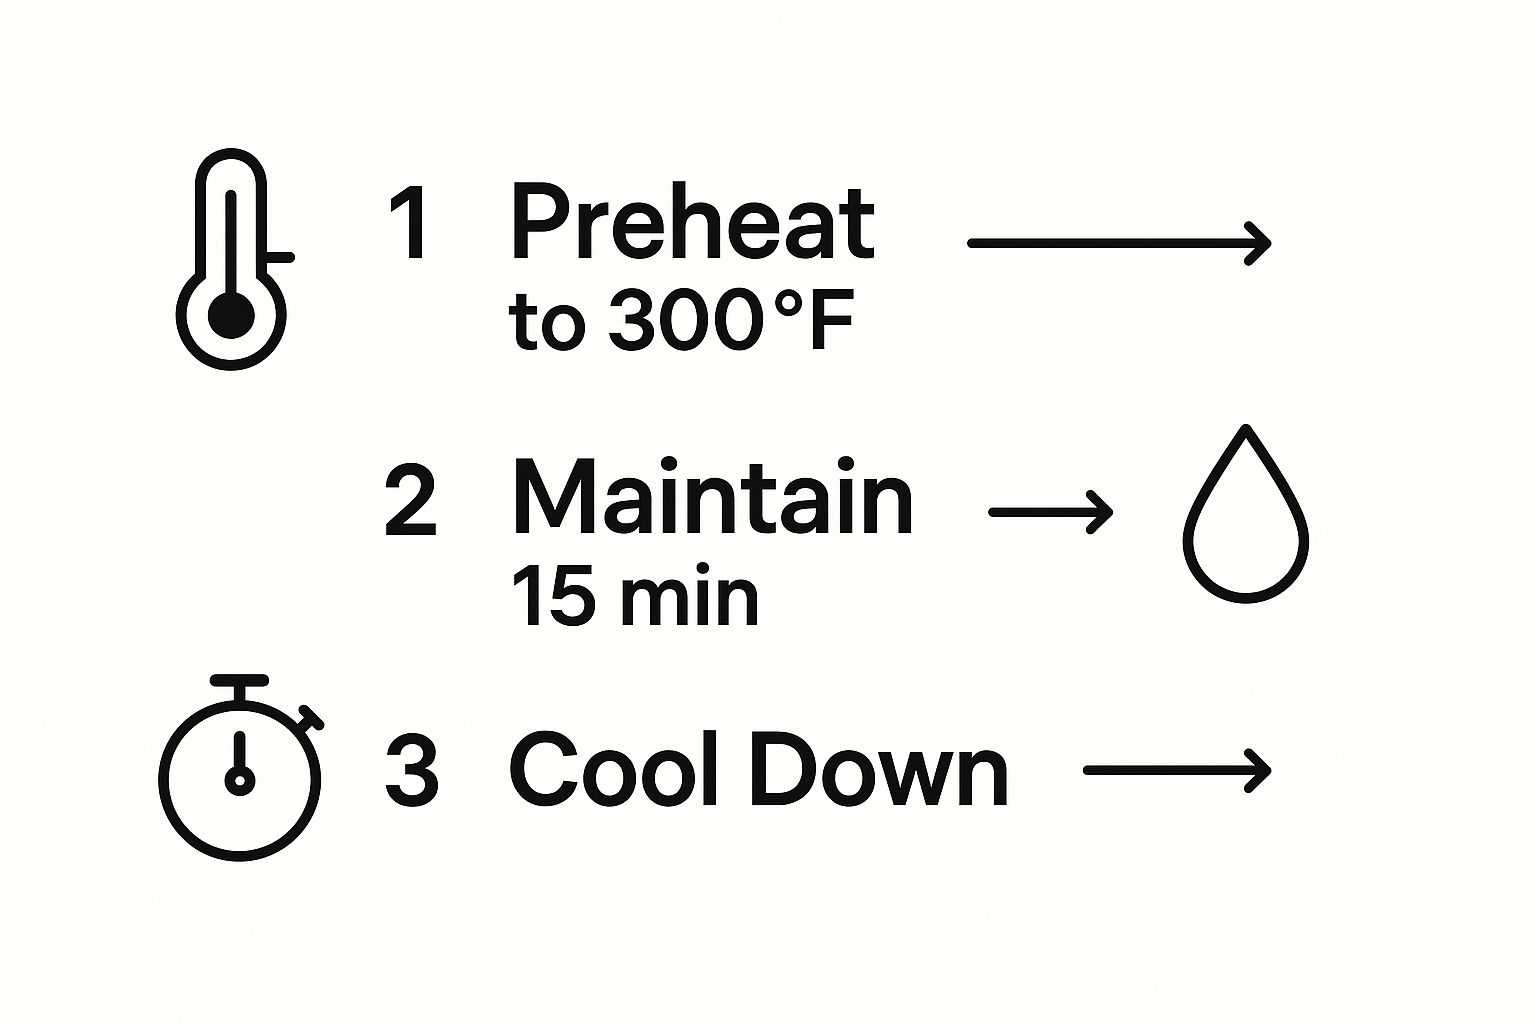
As the graphic shows, you'll preheat the griddle, hold that temp to let the oil work its magic, and then cool it down before the next coat.
Crank your griddle up to high heat and keep a close eye on it. In about 10-15 minutes, you’ll start to see thin wisps of smoke. That’s your sign! It means polymerization is underway. The oil is literally becoming one with the steel.
Let it smoke for a few minutes. Once it starts to die down, kill the heat and let the griddle cool down just enough so you can safely touch it again with your cloth.
Building a Bulletproof Surface
One layer is a start, but it's not going to give you that bulletproof, jet-black surface you're after. Now, it's just a matter of repetition.
While the griddle is still warm (but not blazing hot), apply another super-thin coat of oil, wiping away the excess just like the first time.
Then, you just repeat the heating and cooling cycle:
- Apply a barely-there layer of oil.
- Heat the griddle until it starts smoking.
- Let the smoke mostly clear, then cut the heat.
- Let it cool down enough to handle the next application.
You’re going to want to do this three to five times to build a really solid foundation. With each cycle, you'll see the color deepen, transforming from dull gray to a rich bronze, and finally to that beautiful, semi-glossy black that every seasoned chef recognizes.
Keeping Your Griddle in Top Shape
Getting that beautiful, slick black finish on a brand-new griddle is a great start. But the real work? That's in the day-to-day upkeep. A perfect cooking surface isn't something you achieve once; it's a daily practice that protects your investment and guarantees you get the same great results, shift after shift.
The trick is to have a simple, consistent routine.
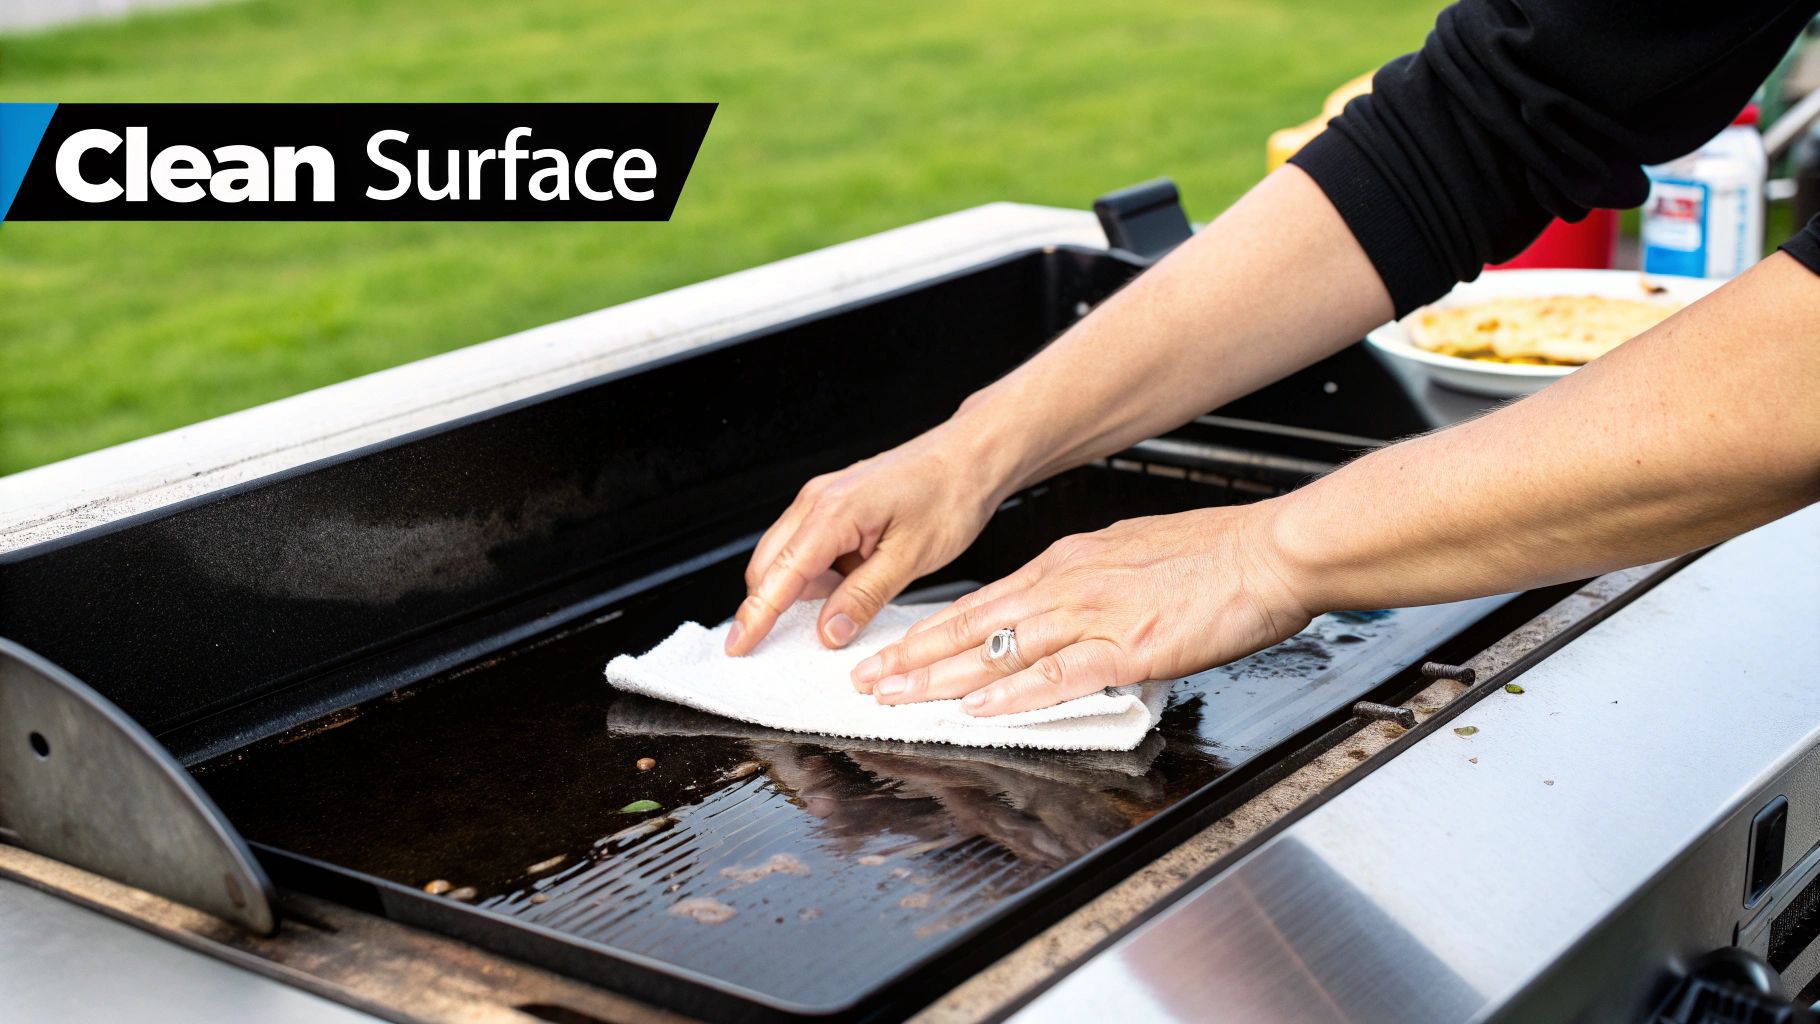
The best time to clean your griddle is while it’s still warm—not scorching hot, but warm enough that grease and food bits haven't had a chance to set. You can forget the harsh soaps and chemicals. All you really need is a good scraper, some warm water, and a non-abrasive pad. Scrape it down, use a little water to steam off anything stubborn, and give it a final wipe. Done.
This isn't just about cleanliness; it's smart business. A poorly maintained surface can actually increase energy use by up to 15%. Keeping it in prime condition is good for your food, your wallet, and the life of your equipment.
The Final Touch After Every Clean
Once the griddle is clean, it's exposed. You never want to leave that bare steel sitting out, especially while it's still warm. Humidity in the air is all it takes for rust to start creeping in.
This is where the final, non-negotiable step comes in: apply a super-thin coat of seasoning oil. We’re talking a teaspoon or two, spread evenly with a paper towel. That’s it. This tiny step creates a protective barrier that keeps the surface slick, rust-free, and ready to fire up for the next service.
Knowing When It's Time for a Touch-Up
Even with the best daily care, a griddle in a busy kitchen will eventually show some wear. You don’t need to strip it bare and start over from scratch unless something has gone seriously wrong. Most of the time, you just need to watch for the little signs that a quick re-season is in order.
- You see dull spots: Patches of the griddle start to lose that dark, glossy sheen and look a bit gray or matte.
- Food starts to stick: The corner where your pancakes always slid off perfectly suddenly starts grabbing. That’s a clear sign the seasoning is compromised.
- You notice flaking: Tiny flakes of the seasoning are coming off, or the color across the cooktop is becoming uneven.
Often, a quick touch-up is all you need. Just clean the surface thoroughly and apply one or two fresh, thin layers of oil, heating each one until it just starts to smoke—exactly like you did in the beginning. This simple process reinforces the seasoning without the hassle of a full reset.
Keep an eye out for these cues, and you'll maintain that flawless non-stick surface indefinitely. For more deep dives into griddle care and other pro tips, check out what’s new on our griddle blog.
Common Seasoning Mistakes and How to Fix Them
Look, even the most seasoned chefs can run into hiccups when seasoning a new griddle. It happens. The key is knowing what went wrong and how to fix it fast, so you can get back to cooking without a headache.
One of the most common issues is a sticky or tacky surface. If your griddle feels gummy, you've probably made one of two classic mistakes: you either globbed on way too much oil, or you didn't let the griddle get hot enough for the oil to fully polymerize. You're aiming for a super-thin layer of oil—so thin you can barely see it.
Another problem you might run into is flaking seasoning. This is when that nice, dark surface you built starts to peel or chip off. Most of the time, this points back to a cleaning issue. Either you didn't scrub off all the factory gunk before you started, or you shocked the griddle with a big temperature change, like splashing cold water onto a screaming hot surface.
Fixing Uneven or Damaged Seasoning
If you've just got a small problem area, like a tiny patch of rust or an uneven spot, don't panic. You probably don't need to nuke the whole thing and start over. You can usually just spot-treat it.
For a rust spot, grab some fine-grade steel wool or a griddle stone and gently scrub until it's gone. Wipe it down so it's perfectly clean and dry, then apply a tiny bit of oil to that spot and heat it until it smokes. That should patch the seasoning right up.
If the seasoning is a mess all over—like it's sticky everywhere or flaking in big patches—it’s time to rip off the band-aid and start fresh. Trying to cook on a bad surface is just asking for trouble and will only make things worse down the line.
When to Strip It and Start Over
To get a fresh start, you need to scrape that bad seasoning layer completely off, all the way down to the bare steel. Once you're back to the beginning, give it a good wash with soap and water (just like you did when it was new), dry it thoroughly, and then begin the seasoning process again.
It might feel like a step backward, but getting the foundation right is everything. A perfect seasoning isn't just a protective coat; it's what builds incredible flavor in a professional kitchen. This focus on building flavor from the ground up is a big reason why the entire industry is seeing such huge growth, as you can see in recent reports on the global seasonings market.
Griddle Seasoning FAQs
Even when you've got the process down, questions pop up in the heat of service. Here are some of the most common things we get asked about seasoning and maintaining a commercial griddle.
How Often Do I Need to Re-Season My Commercial Griddle?
If you're keeping up with daily cleaning and oiling, a full, strip-it-down-to-bare-metal re-seasoning is something you’ll almost never have to do. It’s more about maintenance than starting over.
Think of it as touching up the surface. We recommend a light re-seasoning about once a week, or any time you feel food starting to drag or stick. Just give it a good scrape, clean with hot water, and apply one or two new, super-thin layers of oil. Heat each one until it smokes, and you’ll reinforce that non-stick surface without a major project.
What Does a Perfectly Seasoned Griddle Look Like?
You're looking for a deep, uniform black color with a subtle, semi-glossy shine—not a greasy, wet look. The surface itself should feel incredibly slick and smooth to the touch. If it feels tacky or sticky, the oil hasn't fully polymerized.
But the real proof is in the cooking. Pancakes should glide, and eggs should lift right off with minimal effort. Over months and years of use, this dark patina will get even deeper and tougher. That’s the sign of a griddle that’s been cared for properly.
A well-cared-for griddle surface is a direct reflection of a well-run kitchen. It's not just about aesthetics; it's about consistency, efficiency, and the quality of the food you serve every single day.
Can I Use Soap on My Seasoned Griddle?
That’s a hard no. After you’ve done that very first cleaning to get the factory coating off, soap becomes the number one enemy of your seasoning. The detergents are designed to break down grease and oil, which is exactly what your protective seasoning is made of.
Stick to the basics for your daily clean. A griddle scraper and hot water (while the flattop is still warm) are all you need to lift off any food residue. Once it's clean, wipe it bone dry and finish with a thin coat of oil to protect it until the next service.
Ready to equip your kitchen with a griddle that can handle the pressure? Griddles.com offers a curated selection of commercial-grade griddles designed for reliability and performance. Find the perfect griddle for your operation today.