

Natural Gas to Propane Conversion Kit for Commercial Griddle Success
At its core, a natural gas to propane conversion kit for a commercial griddle is simply the collection of specific parts you need to make your equipment run safely on propane instead of natural gas. For a food truck that can't exactly plug into a city gas line, this isn't just a modification; it's a necessity. The process involves swapping out key components to properly handle propane’s higher pressure and energy output.
Why Mobile Kitchens Are Switching to Propane
When your whole business is on wheels, your fuel source is the lifeblood of the operation. Most commercial griddles roll off the factory line set up for natural gas, but that’s not practical when you're cooking on the go. This is where a natural gas to propane conversion kit for stove becomes a smart business move, not just a technical tweak.

Unlocking True Mobility and Flexibility
The single biggest reason to switch your commercial griddle to propane? Freedom. Plain and simple. Natural gas requires a physical pipeline, chaining your kitchen to one spot. For a food truck, caterer, or pop-up, that’s a dealbreaker.
Propane, on the other hand, comes in portable tanks, letting you set up shop wherever you can legally park. Suddenly, you can chase the money at places like:
- Festivals and Fairs: Crank out food for massive crowds without ever thinking about a utility hookup.
- Remote Catering Gigs: Haul your kitchen out to weddings and corporate events miles from any infrastructure.
- Strategic Street Corners: Bounce between different neighborhoods to see where the profits are best.
This is the entire business model for mobile vendors. Propane is what makes that mobility—and profitability—possible.
The Power of Energy Density
Beyond just being portable, propane packs a serious punch. For any kitchen on the move, switching from natural gas is a game-changer. Propane delivers roughly twice the energy per unit as natural gas. What does that mean for you? You only need half the volume to get the same BTU output from your griddle.
In North America, where commercial propane use for cooking has jumped 15% year-over-year, some businesses are seeing up to 30% lower fuel costs, especially in areas without natural gas lines.
Every square inch in a food truck is prime real estate. Since propane is more energy-dense, you carry more cooking power in smaller tanks. That frees up valuable space you can’t afford to waste.
This higher energy content also means your griddle often heats up faster and holds its temperature better, even when you're slammed during the lunch rush. It's a small detail that makes a big difference in ticket times and food quality. If you want to dive deeper, check out our detailed breakdown of LP gas vs natural gas.
Real-World Scenarios in Action
Picture this: a smash burger truck at a weekend festival. They need their 48-inch griddle ripping hot for hours straight. With propane, they can line up a few pre-filled tanks and swap them out as needed, never missing a beat. Trying to get that much energy from natural gas would be impossible.
Or think about a catering crew setting up for an outdoor wedding. They can confidently power multiple griddles entirely on propane, serving a perfect meal miles from any building. This kind of reliability is why propane is the go-to fuel for any cooking that happens outside a traditional kitchen. The conversion isn't just about fuel; it's about building a more adaptable, resilient business.
Choosing the Right Propane Conversion Kit for Your Commercial Griddle
Let’s get one thing straight: picking the correct natural gas to propane conversion kit for stove and griddle parts isn't just a good idea. It's an absolute must for safety, performance, and keeping that manufacturer's warranty valid.
Before you even think about picking up a wrench, your first job is to confirm your commercial griddle can even be converted in the first place. You’d be surprised how many can’t.
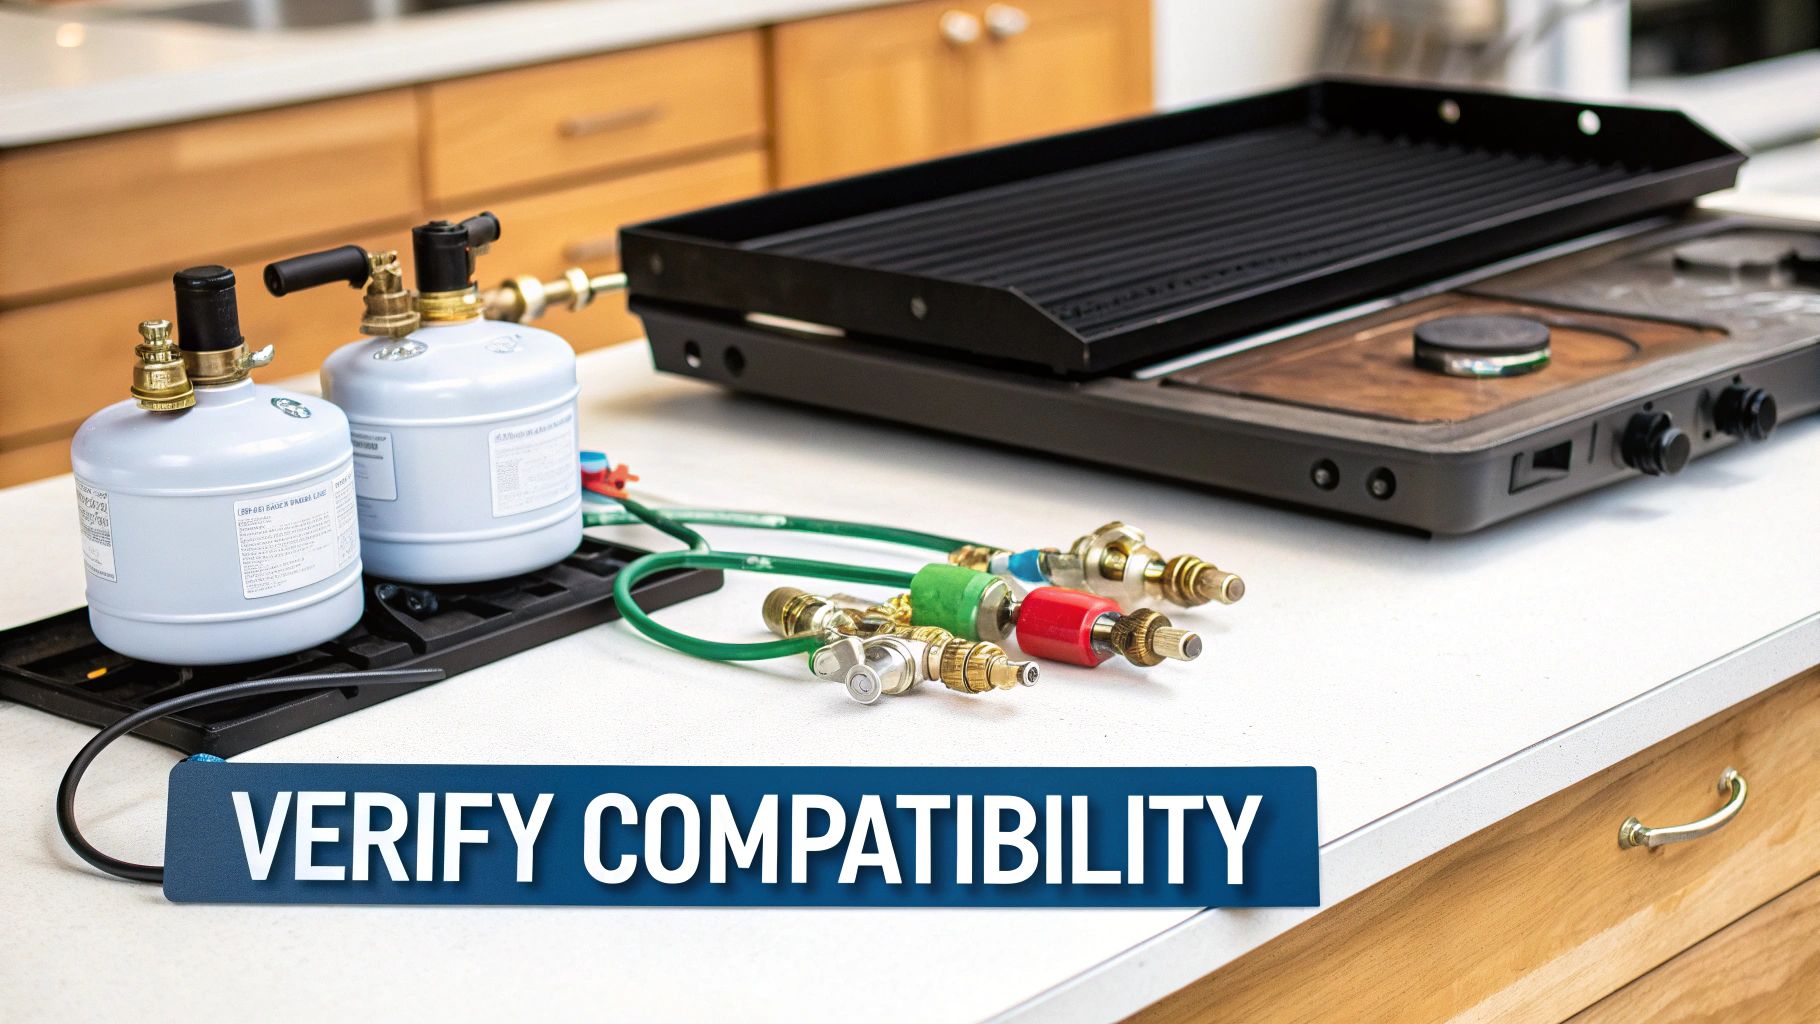
This critical info is always on the griddle’s data plate (or rating plate). Look for a small metal tag, usually tucked away on the back, side, or inside a service panel. It holds the keys to the kingdom: model number, serial number, and the magic words you’re looking for—a statement saying it’s convertible for LP (Liquefied Petroleum) gas. If it doesn’t say "field convertible," your journey stops here. Forcing it is asking for a serious accident.
OEM vs. Aftermarket Kits
Once you’ve got the green light that your griddle is convertible, the next choice is the kit itself. You’ll see two main options out there: OEM (Original Equipment Manufacturer) kits and generic aftermarket ones. That aftermarket kit might look tempting with its lower price tag, but trust me, it’s a massive gamble for your kitchen.
An OEM kit is made by the people who built your griddle. Every part, down to the tiny brass orifices and regulator spring, is engineered specifically for your model’s BTU output and gas flow needs. Aftermarket kits are the "one-size-fits-all" solution, which usually means they don’t fit any one thing perfectly.
Here's a quick look at how they stack up.
OEM vs Aftermarket Conversion Kits Comparison
| Feature | OEM Conversion Kit | Aftermarket Conversion Kit |
|---|---|---|
| Compatibility | Guaranteed to fit and function perfectly with your specific griddle model. | Designed to fit a broad range of models, often resulting in an improper fit. |
| Performance | Ensures correct flame height, BTU output, and efficient fuel consumption. | Can lead to poor performance, like weak flames or dangerous flare-ups. |
| Safety | Parts are tested and certified to meet strict safety standards for your unit. | May not meet safety standards, increasing the risk of gas leaks or CO production. |
| Warranty | Preserves your manufacturer's warranty. | Almost always voids the manufacturer's warranty immediately. |
| Cost | Higher initial cost. | Lower initial cost, but can lead to expensive repairs or replacement. |
The bottom line? The potential savings from a generic kit just aren't worth the risk to your equipment, your staff, or your business. For instance, here at Griddles.com, all our field-convertible Atosa and CookRite griddles ship with the correct OEM kit right in the box to take the guesswork out of it.
Why Precise Parts Matter for Propane
So why all the fuss over specific parts? It boils down to the basic science of natural gas versus propane. Propane is a different beast entirely. It’s delivered at a much higher pressure—around 11 inches of water column (W.C.)—while natural gas trickles in at about 4 inches W.C. Propane also packs more energy into every cubic foot.
This means the components controlling the gas have to be totally different:
- Orifices: These are the tiny brass fittings with a precisely drilled hole that feed gas to the burners. For propane, that hole has to be much smaller to choke back the flow of the higher-pressure gas and create a stable, usable flame.
- Regulator: The kit must also include the right gas pressure regulator parts for propane. An OEM kit will have a new spring or a convertible cap that adjusts the regulator's internal mechanics to safely handle propane's higher pressure.
Using an orifice that’s too big will give you huge, sooty, out-of-control flames that can wreck your griddle. The wrong regulator setup means inconsistent pressure, terrible cooking performance, and a very real risk of gas leaks.
If you’ve misplaced the original kit that came with your griddle, don't just grab a generic one off the shelf. Find that data plate, get the model and serial number, and call the manufacturer or a certified parts dealer. They’ll get you the exact OEM kit you need to do the job right.
The Commercial Griddle Conversion Process Explained
Switching your commercial griddle from natural gas to propane might sound intimidating, but it's a very straightforward job when you know what you're doing. It’s more involved than just swapping out a hose, though. You'll be getting into the guts of the machine to change out a few key parts that handle propane's unique characteristics.
While we always recommend having a qualified pro handle gas work, understanding the process helps you know what's happening, whether you're overseeing the job or tackling it yourself.
First things first: safety. Before a single tool comes out, kill the gas supply. Find the main shut-off valve on the wall behind your griddle and turn it completely off. It’s also a smart move to make sure you have plenty of airflow in your workspace, just in case.
Swapping the Burner Orifices
With the gas off, you can get to the heart of the conversion: replacing the orifices. These little brass fittings, sometimes called "spuds," are basically the gatekeepers that control fuel flow to the burners. On a commercial unit, you’ll have to pull off the heavy griddle plate and maybe the burner tubes to get to them.
You’ll see the natural gas orifices sitting right where the fuel line meets the burner. Grab a correctly sized nut driver and carefully unscrew each one. Here’s a pro tip I learned the hard way: stick a small piece of masking tape inside the socket of your nut driver. It adds just enough grip to hold onto that tiny orifice so it doesn’t fall into the abyss of the griddle’s chassis. Trust me, it saves a ton of frustration.
Next, you'll install the new propane orifices from your natural gas to propane conversion kit for stove and griddle. The first thing you'll notice is how much smaller the hole is. That tiny opening is specifically engineered to restrict the flow of propane, which is under higher pressure than natural gas. This is what gives you a safe, controllable flame.
Key Takeaway: The entire conversion hinges on matching the orifice size to the fuel type. Using a natural gas orifice with propane would create dangerously large, uncontrollable flames, producing excessive carbon monoxide and soot.
Adjusting the Gas Pressure Regulator
Once you’ve replaced every single orifice, it’s time to look at the gas pressure regulator. You'll usually find this where the main gas line connects to your griddle. Its only job is to dial down the gas pressure from the supply line to a level the appliance can handle safely.
Most modern griddles have a convertible regulator, which makes this step pretty simple.
- Use an open-end wrench to unscrew the big cap on the regulator.
- Underneath, you’ll see a small plastic or metal pin, sometimes called a plunger.
- For natural gas, it’s usually installed pin-up. For propane, you need to flip it over so the pin faces down into the regulator body.
- Screw the cap back on tightly.
That simple flip adjusts the internal spring tension, setting it up for propane's higher pressure (around 11 inches W.C. compared to 4 inches W.C. for natural gas). Any time you disconnect and reconnect gas fittings, always use a propane-rated pipe thread sealant—often called pipe dope—to ensure a leak-proof seal. You can dive deeper into why this matters in our guide on gas fittings and quick-connects.
Fine-Tuning the Air Shutters for a Perfect Flame
The last mechanical tweak is adjusting the air shutters on each burner tube. This is a small collar or plate that controls how much oxygen mixes with the gas. Getting this air-to-fuel ratio right is what produces that perfect, clean, hot blue flame.
This final step is more art than science, and you’ll do it after everything is reconnected and running. Loosen a small screw on the burner and rotate the shutter to open or close the air gap. The goal is a steady, mostly blue flame with just a hint of yellow or orange at the tips.
- Too Much Air: The flame is noisy, lifts off the burner, or looks sharp and aggressive. Close the shutter a bit.
- Not Enough Air: You get a lazy, soft, mostly yellow flame. This means you're not getting complete combustion, which wastes fuel and creates soot. Open the shutter up to let more air in.
The demand for this kind of flexibility is huge. The global market for LPG conversion kits hit USD 4.5 billion and is expected to nearly double to USD 8.4 billion by 2033. This trend shows just how valuable field-convertible equipment is. These kits work by adjusting for propane's higher pressure—about 2.5 times that of natural gas—to guarantee safe, efficient flames. A big reason for propane’s popularity is its energy density, packing 91,500 BTU per gallon versus natural gas's 1,000 BTU per cubic foot. You can see more on this growing market over at DataIntelo.com.
By carefully working through these three areas—orifices, regulator, and air shutters—you'll have your commercial griddle running safely and efficiently on its new propane supply.
Post-Conversion Safety and Performance Checks
Alright, you’ve swapped all the parts from your natural gas to propane conversion kit for stove, and the hard part is behind you. But don't fire it up just yet. This next phase is arguably the most important—verifying your work to make sure your griddle is safe and ready for the line. Skipping these checks isn't an option. This is your final quality control step.
The very first thing you need to do is a leak test. It’s a simple but non-negotiable step that acts as your primary defense against a dangerous gas leak. Grab a spray bottle and mix up some dish soap and water.
Slowly turn the gas supply back on. Now, go to every single connection you touched—the main gas line, the regulator, and each new orifice at the burners—and spray them down with the soapy water. Keep a close eye on each fitting and watch for bubbles.
- Small, slow bubbles mean you have a minor leak. It still needs to be fixed immediately.
- Fast, frothy bubbling indicates a serious leak. Shut the gas off right away.
If you spot a leak, turn off the gas supply before you do anything else. Take the proper wrench and give the leaking fitting a slight quarter-turn to tighten it, then test it again. Don’t even think about moving on until every connection is 100% bubble-free.
Dialing in the Perfect Burner Flame
Once you've confirmed there are no leaks, it's time to focus on performance. The goal here is a clean, efficient flame that provides consistent heat. A poorly adjusted burner won't just cook unevenly; it can be a safety hazard, potentially producing carbon monoxide.
The trick is getting the air-to-fuel mixture just right by adjusting the air shutter on each burner tube. After a propane conversion, this adjustment is critical. If your flames are burning mostly orange, for example, knowing how to fix an orange flame on a gas stove is essential for safe and efficient operation.
The perfect propane flame is a thing of beauty: stable, quiet, and a vibrant blue with just the faintest yellow tips. That’s the look of complete combustion, telling you you're getting maximum BTUs without wasting fuel or creating soot.
This diagram breaks down the whole process into three core stages: safety first, then the physical orifice swap, and finally, the crucial flame adjustment.
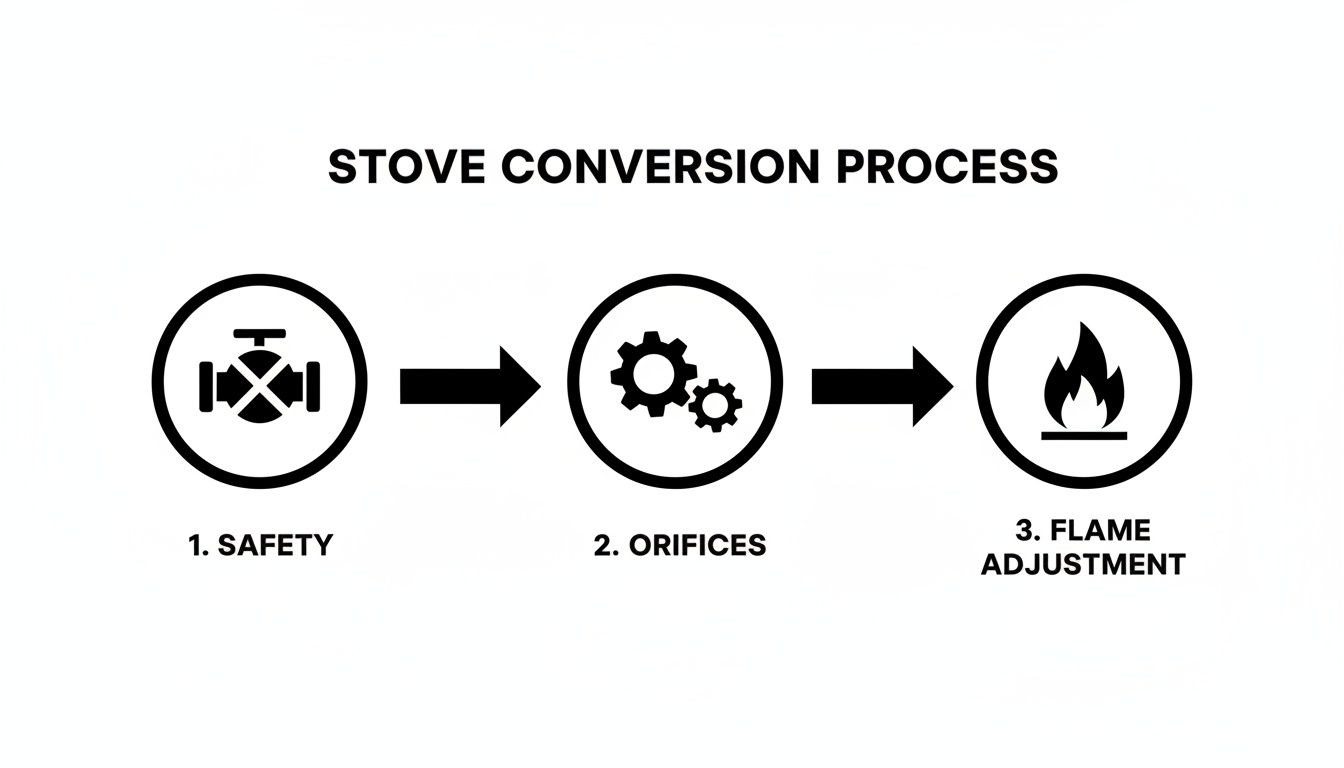
As you can see, the workflow always starts with safety precautions, moves to the mechanical work, and wraps up with performance checks.
Final Performance Adjustments
With the main burners roaring nicely, turn your attention to the pilot light. It needs to be a small, steady blue flame—just big enough to reliably ignite the burners without any hesitation. If it's too big, it's a fuel-waster. Too small, and it could easily blow out during a busy service. Most pilot assemblies have a tiny adjustment screw to dial in the flame height.
Now, let the griddle run for a good 15-20 minutes. You're looking for consistent heat across the entire cooking surface. An infrared thermometer is your best friend here; scan the plate for any major hot or cold spots. Small temperature differences are normal, but a big variance could signal a burner that's still out of alignment or needs further adjustment.
Consistent gas pressure is also key to performance. Ensuring you have the correct natural gas line size for your setup is fundamental, even when converting to propane, as the principles of adequate supply still apply.
Taking the time to perform these checks carefully is what separates a quick fix from a professional, safe installation. It's the final step in ensuring your griddle will be a dependable workhorse for years.
Common Conversion Mistakes to Avoid
Even seasoned pros can hit a snag. A few common slip-ups can turn a simple commercial griddle conversion into a frustrating, and even dangerous, project. Think of this as your pre-flight check—let’s walk through the pitfalls I’ve seen time and again so you can sidestep them completely.
The number one mistake, hands down, is installing the wrong size orifices. This isn't just a minor detail; it’s the heart of the entire conversion. Your natural gas to propane conversion kit for stove comes with precisely drilled orifices for a very good reason.
If you accidentally leave a larger natural gas orifice in just one burner, you’ll get a huge, lazy, sooty yellow flame that screams inefficiency and pumps out carbon monoxide. On the flip side, using a propane orifice that’s too small for a high-BTU burner gives you a weak, sputtering flame that can barely melt butter, let alone sear a burger.
Failing to Adjust the Gas Regulator
Right behind the orifice issue is forgetting to adjust the gas pressure regulator. Most modern commercial griddles ship with a convertible regulator, but it needs your help to make the switch. You have to physically unscrew the cap and flip the internal pin to set it for propane's higher pressure.
Skip this step, and you’re sending high-pressure propane into a regulator that's still set for low-pressure natural gas.
This is a recipe for disaster. You’re looking at dangerously high gas pressure hitting the burners, which can cause massive flare-ups, damage internal parts, and create a serious fire risk. It's a two-minute task that prevents a major headache.
That regulator is your griddle's last line of defense against pressure surges. Make sure it's set for the right fuel.
Over-Tightening Fittings and Stripping Threads
When you're working with gas lines, the temptation to crank down on every fitting with all your might is strong. Resist it. Those fittings, especially the small brass orifices, are made of soft metal.
Go full Hercules on them, and you’ll strip the threads, making a proper seal impossible. A stripped orifice is junk; it has to be replaced. The right way to do it is to tighten fittings until they are snug, then give them one final quarter-turn with the wrench. The pipe sealant does the real work of sealing, not sheer force.
Here are a few other common missteps I see all the time:
- Using the Wrong Sealant: Standard white Teflon tape is a no-go for gas lines. You need the yellow pipe dope or tape that is specifically rated for both propane and natural gas.
- Forgetting a Burner: You'd be surprised how easy it is to miss an orifice, especially on a big 48-inch griddle with four or more burners. Do a headcount before and after.
- Not Verifying Compatibility: Trying to convert a griddle that isn't explicitly marked as "field-convertible" by the manufacturer is just asking for trouble. Don't do it.
Skipping the Final Leak Test
This is the big one—the most dangerous mistake of all. After you’ve got everything back together, the urge to fire up the griddle and see it in action is powerful. Don't do it.
You must perform a thorough leak test using a soapy water solution on every single connection you touched. Every fitting, every valve. A tiny, undetected leak can fill an enclosed space like a food truck with explosive gas in no time. This five-minute check is the single most important safety step in the entire process. Be patient, be methodical, and don't even think about lighting that pilot until you are 100% sure every connection is bubble-free.
Your Propane Conversion Questions Answered
When you’re gearing up to switch a commercial griddle from natural gas to propane using a conversion kit, a few key questions always pop up. Getting the right answers is critical, especially in a busy kitchen where you can't afford mistakes. Let's tackle the most common ones we hear from chefs and owners.
Can I Use Any Conversion Kit for My Commercial Griddle?
That’s a hard no. You absolutely must use the specific Original Equipment Manufacturer (OEM) conversion kit made for your griddle's exact make and model. Trying to use a universal or aftermarket kit in a commercial kitchen is asking for trouble.
Those generic kits might not have the right size orifices or a compatible regulator. This mismatch is a recipe for disaster—it can cause dangerous gas leaks, inefficient flames that waste fuel, and nasty soot buildup. Plus, it's a surefire way to void your equipment's warranty. Always double-check your griddle's model number and get the precise kit the manufacturer specifies.
Do I Need a Professional for the Installation?
Look, we've laid out the steps to help you understand what's involved, but for commercial equipment, we strongly recommend hiring a licensed and certified gas technician. A professional kitchen is a high-stakes environment, and a botched installation is a serious fire and safety risk. It's just not worth it.
A pro brings the right tools to the job, including a manometer to test and set the gas pressure perfectly. More importantly, they know the local fire and safety codes inside and out, ensuring your setup is 100% compliant. This is not a corner you want to cut.
How Do I Know the Flame Is Adjusted Correctly?
Once you've converted to propane, the flame is your best indicator. A perfectly adjusted griddle flame should be stable, quiet, and mostly blue with just a hint of yellow at the tips. That's the look of clean, efficient combustion.
If you spot any of these warning signs, you’ll need to make some adjustments:
- Big, loud, and mostly yellow flames: This means you're getting incomplete combustion. It wastes fuel and can produce dangerous carbon monoxide and soot that will clog your burners.
- Flames "lifting" or jumping off the burner: This is usually a sign that the gas pressure is too high or your air-to-fuel ratio is off.
The fix is to carefully adjust the air shutter on the burner tube. Tweak it until the flame looks right—a nice, steady blue. This ensures you’re getting maximum heat and, most importantly, running your griddle safely.
Ready to make sure your conversion is done right? Griddles.com offers field-convertible griddles that often include the correct OEM kit right in the box, which takes all the guesswork out of the equation. Explore our full range of professional-grade equipment at https://griddles.com and power your kitchen with confidence.